Wednesday, December 26, 2007

Two Steps From Hell Chile Verde


Tami of runningwithtweezers always has some great blog event ideas and her RWT Chile Cook-Off comes at a good time when we are full of elegant and rich Christmas dishes and need a humble pot of good chili to head us into the New Year.

Don't let this seemingly innocuous bowl of chile verde fool you! Upon first taste, your inner fire alarm begins to clang, but before it reaches the three alarm stage, the heat begins to mellow out to a nice glow. I used two jalapenos which was plenty hot for me, but for inveterate chileheads, go for the max-eight! Chile Verde is a great make-ahead dish and seems to improve upon reheating. Serve over rice and garnish with cilantro and chopped radishes.

Prior to browning the pork tenderloin, the meat is seasoned with a rub consisting of oregano, ground cumin, cayenne pepper, ground coriander, and freshly ground black pepper. This spicy rub permeates the pork and gives the chile verde depth and some additional heat.


Chile Verde

Rub

1 tablespoon oregano
2 teaspoons ground cumin
1 teaspoon ground coriander
1/2 teaspoon freshly ground pepper
1/2 teaspoon cayenne pepper

3-3 1/2 pounds pork tenderloin

2 medium onions, chopped
6-8 garlic cloves, minced
4 tablespoons oil
2 bay leaves
1 12 oz. can beer
4 cups good chicken broth
10 green chiles, charred, peeled, seeded and stemmed
or
1 7oz can chopped green chiles
2-8 jalapenos, seeds and ribs removed, minced
6 carrots, peeled and cut into chunks
3 russet potatoes, peeled and cut into chunks

Cilantro and chopped radishes for garnish

Cut meat into 2 inch pieces and rub thoroughly with the spice rub. Brown the meat in batches, using two tablespoons of oil at a time. Set meat aside when browned. Saute onion until soft, then add garlic.

Return the meat to the pan with the onion and garlic. Pour in the beer and simmer briskly, than add the broth and bay leaves. Cook for 30 minutes. Add the chiles and jalapenos, cook for 45 minutes, than add potatoes and carrots. Simmer until vegetables are tender, but not mushy. Correct seasonings.

Serve over rice and garnish with cilantro. Serves 6.

Recipe adapted from "Red and Green Chile Book" by Jacqueline Higuera McMahan

Saturday, December 22, 2007

Buche de Noel


I kept reminding myself that the reason I joined Daring Bakers was to challenge myself to bake new and different dishes that I would never attempt on my own. "You can do it, you can do it," I say the entire time I go through each step of the Buche de Noel recipe. Well, I have done it!! After a few mistakes, none fatal to the Buche, the cake came together. Now whether it is a professional job, the jury is still out on that one.

I followed the recipe, but brushed the baked, unrolled cake with an orange syrup and filled the cake with chocolate whipped cream which another flavor dimension to this rich dessert. It was a humid day when I make my buche, so I chose the marzipan mushrooms instead of the meringue ones.

Orange Syrup

1/4 cup sugar
1/4 cup water
3 tablespoons Triple-Sec or fresh orange juice

Simmer sugar and water in a saucepan over medium heat until the sugar dissolves. Remove from heat and add liqueur. Set aside until ready to brush on cake.


Chocolate Whipped Cream Filling

2 cups heavy cream
1/2 cup confectioners' sugar
1/2 cup unsweetened cocoa powder
1 teaspoon vanilla extract

Combine ingredients in a large mixing bowl, whip until stiff and thick. Refrigerate.

When the cake has cooled, brush with the orange syrup, then following directions in the recipe, fill with the chocolate whipped cream filling instead he of the buttercream. Continue with original recipe.


To Garnish

Fresh Rosemary cut into suitable lengths-4 inches or so
Dried Cranberries or fresh using this recipe from Cooking Light
1 egg white
1 tablespoon water
granulated sugar

Whisk egg white with water until frothy. Using a small pastry, paint egg white onto leaves and stem of the rosemary, Dip into the granulated sugar, shaking off excess. Let dry for several hours before using.


Thanks to Lisa and Ivonne for having the confidence in all of theDaring Bakers' to put forth such a challenging and beautiful holiday dessert.

Wednesday, December 19, 2007

Babas Au Rhum

This is a post from December, 2006, but it is such a gorgeous holiday dessert I decided to post it again. As I said in the original post, I have made these for years and my family thinks they are fabulous. You can substitute fruit juice for the rum.

Happy Holidays!


As the legend goes, the Baba Au Rhum was named for a Polish king who dipped his stale bread in rum to improve the taste and it was said that he named his concoction after Ali Baba, a folk hero during the 1600's. My near perfect recipe for Babas was lost in a move and I sought to recover the taste and texture I remembered from several years ago. It was a struggle-two unsatisfactory batches were made, one in the bread machine and one in the mixer. The mixer by far had the best texture, but still wasn't my recipe. Cooks Illustrated Baking Illustrated cookbook came to the rescue. Here is my adaptation.

Babas Au Rhum

For the batter

3 cups unbleached all-purpose flour
1 envelope rapid dry yeast
1/4 cup sugar
1/2 teaspoon salt
1/2 cup water, room temperature
4 large eggs
2 teaspoons grated zest from 1 lemon
2 sticks unsalted butter, cut into 16 pieces and softened

Syrup
1 1/4 cups water
1/2 cup sugar
1/2 dark rum

Glaze
1/2 cup apple jelly, heated

Have all ingredients for the batter at room temperature. In a medium bowl, combine the flour, yeast, sugar and salt. In a mixer bowl, combine the water, eggs and lemon zest and mix well. Add the flour mixture and mix at low speed until well mixed, scraping the sides of the mixer bowl. With mixer running, add butter a tablespoon at a time until batter is smooth.

Pour the batter into 2 lightly greased popover pans, filling each about halfway and let rise at room temperature about two hours. When ready to bake, place in a preheated 375 degree oven on the middle rack. Bake 15 minutes, rotating pans at halfway point. Babas should be a golden brown. Transfer pans to a wire cooling rack. After about 5 minutes, remove babas from pan and continue to cool.

Combine the water and sugar in a pan, stirring to dissolve sugar and bring to a simmer. Remove pan from heat and add the rum.

Using tongs, take a cooled baba and dip into the rum syrup, turning to coat, leaving the baba in the syrup no more that 5 seconds. Repeat with remaining babas. Brush the melted apple jelly on top of the babas. Serve with sweetened whipped cream.

Makes 12

Can be frozen for two weeks. Glaze with apple jelly before serving.

Tuesday, December 11, 2007

Cinnamon Beef Noodles


The most widely used spice, Cinnamon has a long history dating back to 2000 BC when it was imported to Eygpt from China. A highly fragrant spice, cinnamon is mentioned in the Bible and other classical literary works and was so highly regarded in the ancient world that it was given as gifts to heads of state and other people of status.

Cinnamon is used in nearly all cuisines from appetizers to desserts. Apples and cinnamon have a natural affinity and the smells of cinnamon while cooking evoke an inviting home life. For more information on cinnamon, read here.


Cinnamon Beef Noodles is a very aromatic soup mingled with the flavors of ginger, star anise, cinnamon and garlic. It's flavor is only improved by reheating.

Ingredients

1 teaspoon vegetable oil
6 scallions , trimmed and cut into 1 1/2' pieces and smashed lightly with the flat side of a knife.
6 cloves garlic, peeled, smashed and thinly sliced
4 slices fresh ginger, smashed lightly with the flat side of a knife and thinly sliced
1 1/2 teaspoons hot chile paste
2 cinnamon sticks
1 star anise
8 1/2 cups water
1/2 cup soy sauce
2 pounds beef stew meat, trimmed of fat and cut into 1 1/2 inch cubes
10 ounces spinach leaves, stems trimmed, rinsed and drained
1/2 pound flat noodles, such as udon or fettucine, cooked until just tender, rinsed under warm water and drained

To garnish-3 tablespoons minced scallions.

Combine scallions, garlic, ginger, hot chile paste, cinnamon and star anise in a small bowl.

Heat a large pot over medium high heat. Add oil, swirl in pan and heat for 30 seconds. Add scallion mixture and stir fry until fragrant, about 20 seconds. Add water and soy sauce and bring to a boil. Add beef and return mixture to a boil. Reduce heat to low and simmer for about 1 1/2 hours or until beef is tender. Skim surface. Remove ginger slices, star anise and cinnamon sticks and discard. Add spinach and bring to a boil.

Divide noodles among 6 soup bowls. Ladle the meat, spinach and broth over the noodles and sprinkle with the scallions. Serves 6

Monday, December 3, 2007

Thai Clams and Noodles


I am very particular where I buy fresh seafood and usually go straight to the source, a seafood company or a grocer who buys direct, so I was thrilled to find in a small grocery store that I frequent, fresh clams from Half Moon River Clam company in Savannah Georgia, owned and operated by John Pelli. John has basically a one man operation growing and harvesting his clams and wants to keep his company small. He is licensed and the waters that he puts his clam seeds in are monitored for cleanliness by the Georgia Department of Natural Resources (DNR).


The clams I bought for the Thai Clams and Noodles dish are mid-neck clams which are from 1 1/ inches to 1 1/2 inches thick. Clams are graded out according to size from the 3/4 inch pasta on up to chowders which are 2 1/2 inches and up. Clams have a shelf life of about two weeks when the waters are cold, but the
shelf life in the summer is only about one week. When harvesting in the summer months, John Pelli is very diligent in keeping his clams at the proper temperature by putting them in coolers with frozen bottles of water to gradually bring their temperatures down so as not to shock them. His clams are sweet and has a natural briny flavor.


An unpretentious dish, Thai Clams and Noodles is quite simple to prepare and not counting the time needed for scrubbing the clams and soaking them in cold, salted water can be on the table in about 30 minutes or less. Garlic, crushed red pepper and scallions make up the spicy seasonings, water and rice wine or sake make up the liquids to cook the clams in. A heavenly dish that should serve 6, but only the two of us as we were watching the college football games this past Saturday.

Ingredients

1 teaspoon olive oil
1 teaspoon crushed red pepper
8 cloves garlic, peeled, smashed and sliced thin
8 scallions, trimmed, cut into 1 1/2 inch lengths and smashed with the flat side of a knife
1 1/2 cups water
3/4 cup rice wine or sake. (I used a ginger wine that is make by placing the whole pieces of ginger, unpeeled, in a jar with sherry or white wine and refrigerated for several days to infuse.)
3 pounds mid neck clams, scrubbed, soaked in salted water to cover for an hour to allow the clams to purge themselves of any sand and debris.
1/4 pound somen or angel hair pasta, cooked until tender, rinsed under warm water and drained
1 cup Thai holy basil or sweet basil, finely shredded
2 tablespoons fish sauce, optional

Heat a large heavy saucepan over high heat.Add the oil and heat until hot,about 30 seconds. Add the crushed red pepper, garlic and scallions and stir fry for about 30 seconds, or until fragrant. Add water and rice wine, cover and bring to a boil. Add the clams, cover and bring to a boil. Reduce heat to medium and cook, shaking the pot occasionally to cook the clams evenly for about 8 minutes, or until the clams open. Discard any clams that don't open.

Divide the noodles equally among six soup bowls. Add the basil to the clams, stir gently, cover and cook for 30 seconds. Add the optional fish sauce. Ladle the clams and broth into the bowls and served immediately.

Recipe adapted from "Asian Noodles" by Nina Simonds

Monday, November 26, 2007

Daring Bakers-Potato Bread with a Bonus-Green Olive Focaccia


Baking bread is probably the most enjoyable experience that I have in my kitchen. There is nothing more satisfying than a freshly baked homemade loaf of bread, so I was elated when Tanna of mykitcheninhalfcups chose potato bread as the November Daring Bakers challenge.Since I normally used my bread machine's dough cycle to mix and knead, I was especially thrilled to see that one of the rules required hand kneading the dough. I missed feeling the bread in my hands transform from a shaggy mass to satiny elastic dough ready to be shaped for baking.

Tanna's recipe worked quite well with the 16 ounces of potato and made a soft, but manageable dough. I used King Arthur European Artisan Flour suggested as an alternative to all-purpose flour. The finished loaf made great toast and even good French toast, but my favorite part of the challenge was making the Green Olive Focaccia. The potato dough was perfect for the focaccia!


If only the photograph session had been as easy! I realized I had left my trusty Bogen-Manfrotto tripod in Atlanta while visiting my daughter. In a frenzy, I rushed to the local camera store to buy one and although there was a poor selection of sturdy ones, I found one that could possibly support the weight of my hefty Canon 5D and 100mm Macro lens. Halfway through photographing, my Yorkie, Razzle prances in with the body cap for my camera in his mouth and partially chewed. Was I ever going to get this done! Finally, after chasing the dog around the house for my cap and before I lost my light, I got the photos.
A good thing I did for we demolished the focaccia before dinner!

Looking forward to the next Daring Bakers challenge.


Wednesday, November 14, 2007

Chicken Coconut Curry With Scallion Pancakes


Like everyone who is busy preparing for the Holidays, I need a dish that takes minimal time and effort , but has loads of color and flavor and warms the body on crisp Fall nights. Donna Hay's "New Food Fast" features a great chicken poached in coconut curry that fits the bill. Ingredients such as red curry paste and coconut milk are probably already in your pantry if you are a Thai food aficionado. Sweet potatoes added to the curried chicken adds another flavor element and also, gives color to the dish. The scallion pancakes are simple to prepare and is a nice complement to the coconut curried chicken sauce. Wonderfully fragrant jasmine rice makes this a complete meal. Golden Phoenix is a good brand of jasmine rice from Thailand.


Chicken Coconut Curry

1-3 tablespoons red curry paste (red curry paste is quite hot-I used 1 1/2tablespoons)
6 chicken thigh fillets, halved (if large, quartered)
2 cups chopped (3/4 inch pieces)
2 cups chicken stock
1 1/2 cups coconut milk (I used light coconut milk)
1/4 cup chopped cilantro leaves


Fry the curry paste in a pan over medium-high heat until fragrant, 1-2 minutes. Add the chicken and sweet potato to the pan and cook for 2 minutes. Add the stock and coconut milk and reduce heat to low. Do not boil the coconut milk as it will separate. Allow to simmer gently until the chicken and sweet potatoes are done, about 20 minutes. Serve over jasmine rice and garnish with cilantro leaves.
Serves 4.

Scallion Pancakes

2 cups all-purpose flour, extra for rolling out pancakes
1/2 tsp salt
1 cup boiling water
4 scallions, green and white parts, thinly sliced
2 tablespoons sesame oil

Place flour and salt in bowl of food proccesor, process briefly to mix. Add boiling water. Process until dough forms a ball. Remove from processor, cover and let stand for 30 minutes. When ready to make pancakes, divide dough into three pieces. Roll each into a circle about 7 inches in diameter. Sprinkle one-third of the onion slices over the dough, roll to flatten into dough.Brush with sesame oil. Roll into a cylinder, coil into a circle and roll again into a flat cake about 1/4 inch thick. Repeat with remaining dough pieces. Cook on a gas or charcoal grill or cook in a lightly greased pan about 3 minutes a side. Cut into wedges to serve.

Thursday, November 8, 2007

Apples and Thyme -My Mother's Kitchen

I am happy to be writing this post for the blog event Apples and Thyme hosted by Jen of passionatepalate and Inge of vanieljekitchen. What a great idea to write about memories in the kitchen! I have many with my mother.


My Mother


She took a forty year old alligator purse with her to the hospital for evaluation and transition to an Alzheimer's unit as her disease had been hastened by emergency surgery which the doctors had given her a 5-10% success due to her age and the seriousness of the condition . My mother came through the surgery very well, but grew worse mentally. Somehow, while in the hospital for evaluation, she managed throw away not only the empty alligator purse, but her wedding rings, robe and slippers. I remember the day she bought the purse and regret that it and the fun-loving mother I knew were gone forever. However, she has adjusted well as can be expected in her new home. My sister and I visit her regularly and were joyous when just recently she asked for writing materials and books to read saying she was bored. Alzheimer's is a debilitating disease with no good prognosis, but we are taking one day at a time.


I grew up on a farm where we always had a garden teeming with fresh corn, tomatoes, green beans, okra, watermelon and cantaloupe. It was here that I learned that produce picked fresh from the garden was so much healthier, not to mention tastes better. My mother made use of all this bounty by canning and freezing so we could have good food for the winter. I remember a soup mixture full of tomatoes, corn, butter beans and okra that was a mainstay for Saturday lunch. A large chunk of hot, crispy cornbread cooked in a cast iron pan made our soup lunch complete.When harvest season for soybeans or cotton was in full swing, my mother would work all morning cooking a lunch of fried chicken ,fresh vegetables and frosty ice tea served in Mason jars for the field hands. It was a feast! We lived the original slow food way.


My Family, Circa 1953


On summer days, she would pile us all in the car to go wild plum picking and afterwards, we would have a hot dog and marshmallow roast nearby, careful to extinguish the fires afterwards . I don't think I have ever had plum jelly as good as my mother's was and I don't see the wild plum bushes anymore besides country roads.

Thanksgiving is still my favorite holiday and I cook the same foods my mother cooked, but I have fine-tuned them to my family's tastes. One dessert that I haven't had since I was a child is my mother's 24 Hour Salad. I guess I thought it old-fashioned and I wasn't even sure that the recipe was still around. After talking with my sister, Martha of crossing stitches, who remembered exactly what ingredients made up the dessert, I came up with a recipe. Memories flooded my mind when I tasted this heavenly concoction! It's decadence is enhanced by serving it as a topping for pound cake. An easy dessert to make ahead for the busy holidays.


24 Hour Salad

Ingredients

20 ounce can pineapple tidbits
15 ounce can mandarin oranges
15 ounce can dark sweet cherries
3 eggs
3 tablespoons flour
3/4 cup sugar
1/4 cup fresh lemon juice
1 1/2 cups miniature marshmallows
1 cup heavy cream, whipped
Toasted coconut for serving

Drain juices from the pineapple tidbits and the mandarin oranges and set fruit aside. Add water to the juices, if necessary, to make 1 1/2 cups. Drain cherries separately, blot on paper towel. Reserve and refrigerate.

Combine eggs, flour, sugar, and 1 1/2 cups juice in a heavy saucepan. Cook over medium heat, stirring constantly with a whisk, until thick and boiling. Remove saucepan from heat, stir in lemon juice, transfer to a bowl and refrigerate until very cold.

When custard is cold, fold in drained fruits, except dark cherries, and miniature marshmallows. Fold in whipped cream. Pour into serving bowl and cover. Chill 24 hours. Just before serving, fold in dark cherries. Top with toasted coconut. Serves 8-10.

Monday, November 5, 2007

Roasted Forelle Pears in Red Wine


Pears with Custard Sauce


While doing my weekly grocery shop, I stopped short when I saw some lovely little pears I thought were a variety called Seckel, but had lovely reds and greens with loads of tiny speckles called lenticels. I was familiar with Comice, Anjou, Bosc and Bartlett pears, but I had never heard of Forelle pears. After some research, I found that the Forelle pear is a very old variety brought to the United States by German immigrants in the 1800's and is grown in Oregon and Washington in small crops. These little beauties turn golden yellow as they ripen and their small size makes them wonderful snacking pears, but in cooking the flavor excels.

Pears make very good still life subjects with their beautiful shapes and colors so I had the best of both worlds; I could photograph, cook them and then photograph them again in another state.

Susan Spungen's book, "Recipes, a Collection for the Modern Cook" has a wealth of simple, fresh and flavorful food to serve to family and friends. I chose Roasted Pears in Red Wine, a light but robust dessert that goes well with Fall and Winter dishes, especially Italian. Ms. Spungen suggests serving the Roasted Pears with ricotta cheese, but I had leftover custard from the Bostini Cream Pie, a Daring Bakers challenge from October. The custard poured over the individual pears was not only lovely to look at,
but it's smooth creamy texture went well with the tangy pears.


Pears Ready For the Oven


Roasted Pears With Red Wine

10 Forelle pears,just beginning to ripen and stems intact (you may use 6 Bosc, Bartlett, or Anjou pears instead)
1/2 cup golden raisins
1/2 cup currants
3 tablespoons unsalted butter, at room temperature
1/2 cup sugar
1 1/2 cups dry red wine, a good Italian Chianti (I used a Red Zinfandel)
1 bay leaf
2-3 cinnamon sticks
Finely ground black pepper

Preheat oven to 400 degrees F. Trim the bottom of the pears slightly so they will stand upright in your baking dish. Peel the top halves with a vegetable peeler. Core the pears from the bottom with a melon baller, then stuff the bottoms with the raisins and currants. You will have some leftover to sprinkle on top before baking.

Arrange the pears in a tight fitting dish. Rub the top of each pear with about 1/2 teaspoon butter. Sprinkle the sugar evenly over the pears and pour the wine into the pan. Add the bay leaf, cinnamon sticks, a large pinch of freshly ground pepper, and the remaining raisins and currants and place into the oven.

Roast 30 minutes to an hour, basting every ten to 15 minutes, until tender when pierced with the tip of a knife. The liquid will become quite syrupy. If the pears are cooked before the syrup thickens, remove the pears to a plate and reduce the liquid in a saucepan over medium heat until it thickens. Once the syrup has thickened, return the pears and syrup to the baking pan. Continue to baste the pears with the syrup as they cool, about 15 to 20 minutes. Transfer pears to a serving dish and pour the syrup over. Serve warm. With the small pears, serve one or two with the custard sauce poured over.


Pears After Roasting

Sunday, November 4, 2007

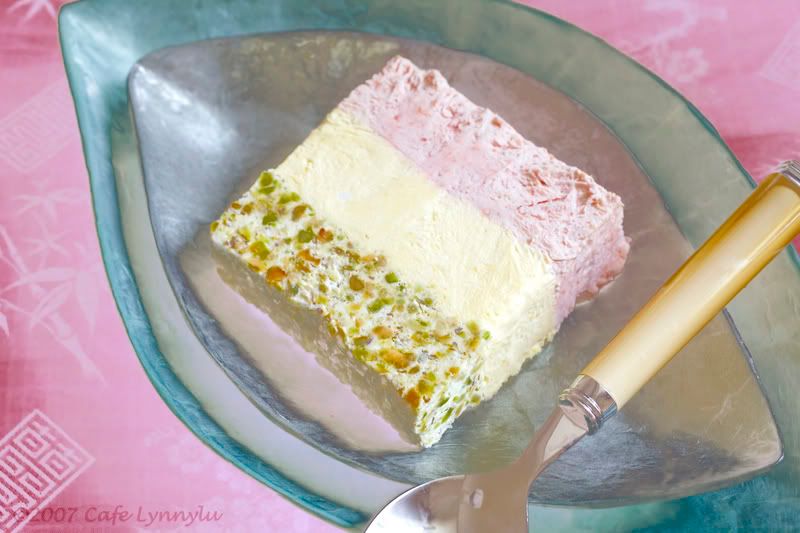
Pistachio, Mango and Blood Orange Terrine


This is from an earlier post.
Entry for Hay, Hay It's Donna Day hosted by Tami of runningwithtweezers.


Terre cuite, French for terracotta, a glazed earthenware container with straight sides and a tight fitting lid, generally oblong or oval is also the name for certain dishes prepared in such a vessel. Terrine's can be sweet or savory, cooked or frozen and with them creativity has no end. This dessert can also be called a Cassata, an Italian term for a rectangular-shaped frozen dessert made with layers of fruit, ice cream or whipped cream. Cassata means "little cases", a reference to the brick type shape of the dessert. It doesn't matter what term you use for this dessert-it's fabulous!

Regarding the two identical photos-the top one I played with in Photoshop wanting to impart a feeling of coldness-any comments, negative or positive appreciated.

Recipe From: Tropical Desserts, Recipes for Exotic Fruits, Nuts, and Spices by Andrew Maclauchlan A marvelous book with top notch photos.

Pistachio, Mango and Blood Orange Terrine

Ingredients

1 1/4 cups pistachios, shelled
1 ripe mango
4 blood oranges
3 cups heavy cream
1/4 cup sugar

Preheat oven to 350 F. Spread pistachios in a single layer on a cookie sheet and toast for 14-16 minutes. Remove and set aside to cool.

Peel the mango and cut the flesh from the pit. Puree in a food processor, and transfer to a bowl. Trip the tops and bottoms of the blood oranges, then cut all the peel and pith from the the flesh. Section the oranges by cutting between the membranes and removing the wedges of fruit. Puree the sections in a food processor and transfer to a second bowl. Clean and dry food processor and process the pistachios until very fine. Transfer to a third bowl.

In the bowl of an electric mixer, whip the cream and sugar until it forms stiff peaks. Divide the whip cream between the three bowls, containing the mango, blood orange and pistachios. Gently fold in mixture with a spatula until combined.

Prepare an 8x4x4 loaf pan by oiling the interior, then line with plastic wrap, pressing into the corners to avoid any air bubbles. Use a large piece of plastic wrap so it can fold over the top of the pan when layers are completed. Pour the blood orange mixture in the bottom and spread with a spatula. Place in freezer for 1/2 hour. Store remaining mixtures in refrigerator while in the layering process. Remove from freezer and repeat with mango mixture. Return to freezer for another 1/2 hour. Repeat with pistachio mixture. Fold the extra plastic wrap over the top of the terrine and freeze at least 2 hours.

To serve, remove terrine from freezer and peel the plastic wrap off the top. Invert terrine on a chilled plate and carefully remove all of the plastic wrap. Dip a sharp chef's knife in very hot water and then slice the terrine into crosswise slices. Rinse knife and repeat until all slices are cut. Serve slices on a well-chilled plate.

Serves 8.


Friday, November 2, 2007

Dried Cranberry, Grape and Pine Nut Salad


I adore dried cranberries! They have the concentrated sweet flavor of fresh cranberries, but with less of the lip-puckering sourness. I have used them in biscotti, relishes, quick breads and many more recipes as they are always available. A recipe for a dried cranberry, green grape and toasted pine nut salad caught my eye in an Italian cooking magazine that I had recently bought. However, as I have reading material with me when I have any appointment that would require my sitting and waiting, I managed to leave the magazine at my exercise class where it disappeared over the weekend. I remembered all the ingredients for the salad, but drew a blank when it came to the dressing. Racking my brain for a suitable dressing, I remembered that I had oranges and I knew they went very well with cranberries. Here is my version of the salad I saw in the magazine, but first, a little bit of information on cranberries.

Drying cranberries is just one way to preserve the very perishable once a year crop of fresh cranberries. Cranberry juice is a very popular drink and is touted to prevent urinary tract infections. A white cranberry juice is made by harvesting the cranberries about three weeks before they turn red, but are still mature. Commercial sweetened dried cranberries are made using food processing methods not available to the home cook. A big surprise to me when I began researching dried cranberries was that Wisconsin, not Massachusetts produced about one half of the United States annual crop of fresh cranberries.

Whether or not, this tasty little berry was served at America's first Thanksgiving in 1621 will never be known for there is no record of what was served at the actual feast. However, the Native Americans ate many different berries, so the cranberry could have possible been on the menu. I would like to think so. For more information on cranberries, go here


Salad Ingredients

6 cups mixed baby greens
1/2 cup dried cranberries
3/4 cup halved green seedless grapes
1/2 cup toasted pine nuts
1/2 cup crumbled goat cheese

Combine greens, dried cranberries and seedless grapes. Toss with small amount of dressing just to coat leaves and top salad with toasted pine nuts and the crumbled goat cheese. Pass remaining dressing at table.

Orange Honey Dijon Salad Dressing

1 garlic clove, peeled and minced
1/2 tsp salt
1/2 cup fresh orange juice
1 teaspoon Dijon mustard
1 tablespoon honey
1 tablespoon fresh orange zest
2/3 cup olive oil

On cutting board, mash garlic and salt together. Place in bowl, whisk in orange juice, Dijon mustard, honey and orange zest. When combined, whisk in olive oil until dressing is emulsified. Whisk in zest. Season with salt and freshly ground pepper.

Salad serves six. Thinly sliced red onion would be a great addition to this salad as would segmented orange slices.

Monday, October 29, 2007

Bostini Cream Pie


This is my first post for Daring Bakers and Mary of Alpineberry chose an unbelievably
delicious and decadent dessert that one's dinner guests will long remember and marvel at your skills in the kitchen.

Bostini Cream Pie, the high class cousin of Boston cream pie is a light and airy orange chiffon cake served with a smooth and creamy custard sauce and topped with a chocolate glaze. The orange juice and zest marry well with the intense vanilla custard and has a special affinity with the chocolate.

Created by Kurtis Baguley, now executive chef at the Grand America Hotel in Salt Lake City, Utah, Bostini Cream Pie won the San Francisco Chronicle's top recipe for 1996. Still served at Scala's Bistro in San Francisco, Bostini Cream pie is a grand dessert for special occasions.

Thanks to Ivonne of Cream Puffs in Venice and Lis of La Mia Cucina for creating Daring Bakers.

Mary's recipe for Bostini Cream Pie.

Monday, October 22, 2007

Bulgogi or Korean Barbecued Beef


The literal translation of Bulgogi in Korean is "bul"-"fire" and "gogi"-"meat", is traditionally made from beef or pork short ribs thinly sliced across the bone and grilled on skewers. However, beef sirloin is more readily available and less fatty. The meat is marinated in a lovely mixture of soy sauce, sesame oil, sugar and other tasty ingredients such as ginger, scallions garlic and cayenne. After grilling, bulgogi can be wrapped in a lettuce leaf, served over rice or wrapped in thin pancakes. Kimchee is a popular side dish for Bulgogi.


Ingredients

1 1/2 lbs beef sirloin (frozen for about 10 minutes or so for easy slicing)
4 scallions (white and green parts)
2 tablespoons minced fresh ginger
4 garlic cloves, minced
2 tablespoons sesame seeds
3 tablespoons sugar
1 teaspoon freshly ground black pepper
1 teaspoon, or to taste, cayenne pepper
1 tablespoon molasses
1/4 cup fresh lemon juice
1/4 cup soy sauce
2 tablespoons sesame oil
Long metal skewers
Romaine leaves
1 lemon, thinly sliced

Slice the beef diagonally across the grain into long strips about 1/4 inch thick.

Combine the scallions, ginger, garlic, sesame seeds, sugar, black pepper, cayenne, molasses, lemon juice, soy sauce and sesame oil and a bowl and mix well. I doubled the marinade ingredients and reserved half for the sauce. Add the beef slices to the remaining half of the marinade,making sure all the beef is covered with the sauce. Place in a large plastic zippered bag and refrigerate overnight.

Preheat gas grill for 10 minutes on high. While waiting for the grill to get hot, remove beef from refrigerator. Oil or spray vegetable spray on the skewers, then thread a slice of beef lengthwise onto a skewer, keeping it flat. Repeat with remaining beef until all is skewered. Lay the skewers on an oiled grill over medium high heat. Grill, basting with the some of the reserved sauce and turning frequently to evenly cook the meat.

Transfer to a platter and remove the beef from the skewers. Cut into bite size pieces and place on lettuce-garnish with lemon slices and serve. Makes 10-12 skewers.

Recipe from "Asian Grilling" by Su-Mei-Yu

Monday, October 15, 2007

Cottage Pie


Meat pies in England date back to the Middle Ages. The pies consisted of meat, either lamb or beef, but also game was used. Cooked for hours over a slow fire, the pies were seasoned with spices and served in pastry. The Elizabethans favored pies made of mince meat, spices, raisins and prunes, hence "mincemeat".

Shepherd's pie made with cold lamb or mutton and topped with mashed potatoes didn't appear in England until the acceptance of potatoes in that country. Potatoes were introduced to Europe in the early 1500's by the Spanish, but didn't appeal to the English palate until the 18th century. A frugal dish designed to use up leftover meat, Shepherd's Pie originated in the north of England and Scotland where there were large numbers of sheep.

Cottage Pie and Shepherd's Pie are synonymously used to describe a dish made with minced meat and mashed potato topping, but to clarify the difference, Cottage Pie, the much older term for the pie, is made with minced beef and Shepherd's Pie with minced lamb. Today, it doesn't matter whether you call the pie Shepherd's or Cottage. The most important thing is the pie tastes wonderful and is a hearty and satisfying dish for winter meals. A veritable blank canvas, what goes into the meat mixture for Cottage or Shepherd's is up to the imagination and fancy of the cook.

For further reading on Cottage and Shepherd's Pie's, click here.

Cottage Pie


Ingredients

1 tablespoon oil
1 lb lean ground beef
1 medium onion, chopped
1 carrot, peeled and chopped
1 garlic clove, minced
1/4 cup tomato sauce-(I substituted a seasoned pasta sauce for the tomato sauce)
2 tablespoons Worcestershire sauce
salt and pepper
1 cup chicken broth
1 cup frozen peas

For the Mashed Potato Topping

2 pounds (about 3 large potatoes), cut into chunks
1/2 teaspoon salt
1/2 cup milk
2 tablespoons butter

Preheat oven to 400 degrees F.
Saute ground beef, chopped onion, and chopped carrot in oil over medium heat until meat loses it pink color. Add minced garlic and cook one minute more. Add tomato sauce, Worcestershire sauce, salt, pepper and broth and cook uncovered for 15 minutes. Add frozen peas and cook 5 more minutes.

While sauce is simmering, bring a large pot of water to boil, add 1/2 teaspoon salt and potato chunks. Reduce heat and cook until potatoes are tender. Drain in a colander, transfer back to pot and mash adding milk and butter. Taste for seasoning.

Pour meat mixture in a casserole dish and top with mashed potatoes. Bake for 20-25 minutes until potatoes are lightly browned.

Serves 4-6


Saturday, October 13, 2007

Pistachio Cherry Biscotti


A great long-lasting food for travelers many centuries ago, Biscotti was sustenance for the Roman legions on their military campaigns and was probably the original "hard tack", a dry hard biscuit designed to last almost forever by the twice ("bis") baking ("cotto") method. Its relatives are the German zwieback and the English biscuit. Those dunking their high-end little biscuits in a foamy cappuccino at the popular coffee shops today never imagined that biscotti has such utilitarian beginnings.


Biscotti's journey to sophistication began during the Renaissance when a Tuscan baker served the little biscuits dunked in "vin santo", a local sweet wine. The dry, crisp composition of the biscotti was the perfect instrument for dunking.

Authentic Italian biscotti is very simple to make and can be as fancy as you like by adding fruit and nuts or dipping the ends in white or dark chocolate. They make great gifts or for a simple dessert after a heavy meal.Although there are steps involved making biscotti, it is not difficult if you follow a few pointers. In the Spring 2007 issue of Baker's Companion, there is an article on creating authentic Italian biscotti which gives step-by-step instructions to ensure success in making these lovely little crisp cookies. Without going through all the steps in detail, here are three important ones.

1. To keep the biscotti from crumbling after the first baking, spritz the baked dough lightly, but thoroughly with water taking care to cover the sides and the top. Let stand 5 minutes before slicing. This is an important step especially if your biscotti contains nuts and fruits.

2. When cutting the biscotti for the second bake, use a serrated knife and cut with a straight up and down motion. This steps ensures that the biscotti will stand up for the second bake.

3. Instead of flipping the biscotti over to bake a third time, stand them up on the prepared baking sheet so the air can circulate around them as they bake.


Pistachio-Cherry Biscotti

2 large eggs
2/3 cup sugar (4 3/4 oz)
1/2 tsp baking powder
1/2 tsp salt
2 drops strong cherry flavor(optional)or 1 tsp vanilla
1 cup chopped pistachios (4 1/4 oz)
1 cup sweet or sour dried cherries (5 oz)
2 cups King Arthur Unbleached All-Purpose Flour

Preheat oven to 350 degrees F. Line a large baking sheet (18x 13-inch) with parchment paper. In a medium bowl, beat the eggs, sugar, baking powder, and vanilla or cherry flavoring until creamy looking. When properly beaten, the egg/sugar mixture will be thick and lemon colored and drop in a ribbon from the beater.

Lower the mixer speed and add the flour beating gently until incorporated. Transfer the dough to the prepared baking sheet and shape into a rough log about 14 inches long, 2 1/2 inches wide and about 3/4 inch thick. Smooth the top of the dough with a wet dough scraper.

Bake the dough for 25 minutes. With dried fruit and nuts, it may be necessary to bake an additional 5-10 minutes. Remove from oven and let cool on pan from 5-25 minutes. I let mine cool about 15 minutes. Spray with the water as in pointer step 1. Let stand 5 minutes. This will soften the crust to make slicing easier.

Reduce oven temperature to 325 degrees F. Wait 5 minutes, then cut the biscotti on the diagonal into 3/4 inch slices using a serrated knife and straight up and down motions. If you slice the biscotti wider at the top than the bottom, they will topple over while baking the second time.

Set the biscotti upright on the prepared baking sheet 1/2 inch apart so the air can circulate. Bake for 25 minutes. Remove from the oven and transfer to a rack to cool. Store in an airtight container to preserve their texture. If the biscotti aren't as hard as you like, store uncovered overnight to continue drying. Biscotti can be stored at room temperature for two weeks; for longer storage, wrap airtight and freeze. Yield 14-16.

Recipe from The Baker's Companion, Spring 2007, page 64.


For more biscotti recipes, visit King Arthur Flour.

Wednesday, October 10, 2007

San Francisco

Some scenes from our trip to San Francisco. I don't have to tell anyone who has visited this beautiful city that the food is excellent here-from Chinatown to Sunset.
Here are some photos from the trip. I am returning today and will post a pistachio cherry biscotti soon.


Wednesday, October 3, 2007

Coffee Ice Cream and Affogato al Caffe


"Coffee, men and chocolate-some things need to be rich". And rich indeed is this ice cream, the mixture a provocative infusion of fresh coffee beans,whole milk,cream and egg yolks. The ice cream has a much richer,fresher coffee flavor than one made with espresso powder which I find that I don't use all of before it stales.

The recipe comes from The Perfect Scoop by Dave Lebovitz, a great book on ice creams, granitas, sorbets and accompaniments given to me by Laura of eatdrinklive for winning HHDD#13 and whom I promised that there would be a future post with a recipe from The Perfect Scoop.

While not a quick ice cream to make, certain steps can be done ahead and then the mixture can be refrigerated until very cold before processing in an ice cream machine. There are many models of ice cream makers available at very reasonable prices.

After I made the coffee ice cream, I found that Elise from Simply Recipes had made the same recipe from The Perfect Scoop and had included all the steps taken in making the ice cream. Have a look at her post-it's well done.

Coffee Ice Cream


Rather than just serve the coffee ice cream as is, I took the process a step further and made a Affogato al Caffe, "drowned in coffee" in Italian. To make this decadent dessert, place several scoops of the coffee ice cream in a cup and pour a shot of espresso over. Garnish with grated chocolate. Any chocolate or coffee liqueur would also be good poured over when you add the espresso.

Affogato al Caffe


Coffee Ice Cream-From The Perfect Scoop by David Lebovitz

Ingredients

1-1/2 cups whole milk
3/4 cup sugar
1-1/2 cups whole coffee beans
Pinch of salt
1-1/2 cups heavy cream
5 large egg yolks
1/2 teaspoon vanilla extract
1/4 teaspoon finely ground coffee

Warm the milk, sugar, whole coffee beans, salt and 1/4 cup of the cream in a medium saucepan. Once the mixture is warm, cover, remove from the heat and let steep at room temperature for 1 hour.

Rewarm the coffee-infused milk mixture. Pour the remaining 1 cup cream into a large bowl and set a mesh strainer on top. In a separate medium bowl, whisk together the egg yolks. Slowly pour the warm coffee mixture into the egg yolks, whisking constantly, then scrape the warmed egg yolks back into the saucepan.

Stir the mixture constantly over medium heat with a heatproof spatula, scraping the bottom as you stir, until the mixture thickens and coats the spatula. Pour the custard through the strainer and stir it into the cream. Press on the coffee beans in the strainer to extract as much of the coffee flavor as possible, then discard the beans. Mix in the vanilla and the finely ground coffee and stir until cool over an ice bath.

Chill the mixture thoroughly in the refrigerator, then freeze it in your ice cream maker according to manufacturer's instructions. Makes about 1 quart.