Happy Wednesday everyone! I hope you are all having a wonderful week. I started vacation this morning at 7am (yay me!) and tomorrow is my munchkin's birthday, so I am knee deep in Hello Kitty! I need to get into my craft room today and make her a card! Bad Mama!! Today Mary challenged us to make a Valentine's card. here is what I came up with:
Cute eh? I cut the main image out of A Child's Year. The layer underneath is from hmmm... I am drawing a total blank, and I only made this card yesterday :) LOL! You gotta love my brain on night shift! Once Upon a Princess maybe? I will check and update later. The stamp is from My Pink Stamper. Paper is all from my scraps.
**eta** I double checked on my Gypsy girl, the second layer is from Once Upon a Princess, maybe my brain post night shift isn't so bad... :)
You should pop over to Cricut Cardz Challenge and check out what the super talented design team came up with! Then, make sure you play along with us, and show us how super talented YOU are!
A few challenges:
Throwback Thursday - valentines day
Crafty Purple Card - valentines day
Simply Create Too - love is in the air
The Poodles Parlour - valentines
Mami Doodles - for a loved one
Cupcake Inspirations - photo inspiration
The Stamping Boutique - valentines
Paper Creations Ink - love/romance
Stamps R Us - love is in the air
Shabby Tea Room - love is in the air
Paper Sundaes - valentines
One Stop Craft - stitching
Squiggles and Giggles - all loved up
Truly Scrumptious - love and hearts
little red wagon - valentines day
Paper Crafting World - valentines project
More Than Favors - love theme
A la prochaine...
Tuesday, January 31, 2012
Party Time
So I spent most of the last week in my craft room designing my daughter's party invitation and some of the treats we are giving out. They are all Hello Kitty, which she adores! her is what I cam up with:
As you can see, I welded the word "party" to the side of a rectangle. The font is from Robotz and the rectangle is from George and Basic Shapes. I used my Gypsy girl to weld the letters on to the card. It is one of my favorite techniques. I think it makes the card look fabulous! The Hello Kitty is from Hello Kitty Greetings.
This is the inside of the card. The "You're invited" is from Stampin Up. The second stamp I used, with all the invite details is a Recollections Stamp that I picked up at Michael's.
Here is a pic of all the cards I made. Aren't they adorable?? My daughter loved them. She was so excited to give them to all her friends. I will show you all the little goodies over the next few days.
A few challenges I am entering my little cards in -
Karen's Doodles - cute and cuddly
Dream Valley Challenges - animals
Stampin Sisters in Christ - your style (I love cute and am loving welding on my Gypsy girl)
Color Create - green and pink
elke Kaart een Feestje! - make a card for someone special
ABC Challenge - H is for happy birthday
Party Time Tuesdays - anything goes
The Squirrel and The Fox - party creation
A la prochaine...
Monday, January 30, 2012
Christmas Waterfall
I decided over the past few months, that I wanted to try to get on a new Design Team. This card is one I made, but did not end up submitting. I tried a new technique for me, which was lots of fun, but ultimately decided to submit a card that was really my style, which this one isn't :) Here is the card I created:
It's a waterfall card! I followed THIS tutorial from Splitcoast Stamper. It was so much easier than I imagined!
Aren't these little stamps super cute?? Santa slipped them in my stocking this year. Unfortunately, he took them out of their packages, so I have no idea who to credit for these adorable designs. I colored them with my Stampin Up Markers.
I used my stickles to bling up the adorable little creatures. The paper is from a stack I bought last year, I am pretty sure it is from K and Company.
The merry and bright stamp is from Stampin Up. I decided to put a stamp on the inside of the pull card. The "joy" is from My Pink Stamper, and the tree was created by the same company who made the rest of my stamps. I wish I knew it's name... LOL! I was pleased how this card turned out, and how quickly the card came together
A few challenges for my little card:
I Brake for Challenges - fancy folds
Stamp 'n' Doodle - include an animal
Sassy Studio Designs - christmas
Sweet Stampin - animals
Forever Friends - more than 1 fold and include an animal
Thanks for hanging out with me today. I'll be back tomorrow with my daughter's finished birthday invitations!
A la prochaine...
Wednesday, January 25, 2012
Flowers for Gloomy Day
I am on a ROLL! 3 days in a row, I am in my craft room, and 3 days in a row I post those cards to my blog! I am being such a good blogger :) Today I decided to make a card for Peachy Keen Challenge. I just love their adorable stamps, and I want to try to participate in this challenge at least every 2 weeks. It is one of my favorites! Today they challenged us to make a pocket! Huh? A pocket? I have spent the past few days contemplating how I would do this. I finally decided to make a flower pot card. I think they are so pretty, and I have never made one before. Here is what I came up with:
Isn't that ADORABLE! I was SO pleased how this turned out. I followed THIS tutorial on Splitcoast Stampers. It was really easy! I used my Cricut to cut out the flowers. They were from the Sweet Treats and and Paisley cartridges. I used my Princess Faces and Wide Eyed Kids from Peachy keen to stamp their adorable faces. I then used my Sakura Jelly Roll pen to doodle up their little faces. I inked the edges of the flower part and also each of the flowers. I haven't quite decided what I am using this card for yet, I am thinking maybe a Mother's Day card? So i haven't stamped a sentiment on it yet.
A challenge or two:
Peachy Keen - pocket
Jelly Park Challenges - something in my pocket
My Time to Craft - favorite embellishment (ribbon)
Lexi Creation's - fancy folds(flower pot)
Make my Monday - flowers and leaves
Addicted to Stamps - summer in winter
My Sherri Crafts - new things (first time making a flower pot card)
Alphabet Challenge Blog - Y for your choice
Crafty Ann's Challenge - what's new pussy cat? new technique (flower pot)
Hotshot Craft - flowers
Stamping With the Dragon - anything goes
4 Crafty Chicks - summer in January
Creative Inspirations - anything goes
Cricut Cardz Challenge - it's june in january
My Mum's Craft Shop - flowers
A la prochaine...
Tuesday, January 24, 2012
Happy Hearts Day!!
Hello everyone! With my daughter home again today, I only had a little bit of time to spend in my craft room. Since she was home, I decided to make her Valentine's Day card. She is on a Hello Kitty kick right now, in fact, tomorrow's project is to make 10 Hello Kitty invitations for her Birthday party. After that, I get to make a bunch of party favors, all Hello Kitty related. It's going to be all Hello Kitty, all the time for the next week or so at our house :) Here is what I came up with:
So, I cut Hello Kitty at 4.25 inches from Hello Kitty Greetings. I blinged up her little ribbon with stickles, it looks so fancy. I ran the cream background paper through my Dotted Swiss Embossing folder. The dotted paper is in my scrap box. The pink ribbon is from Michael's, as is the red paper and the pink card base. The "love you" is actually 2 stamops that I used together from CTMH.
I think my daughter is going to really like this card! It has some of her favorite things - hello kitty, hearts, bling, ribbon and best of all, pink!! Now I have to get going on the rest of my Valentine's Day cards. Between the Hello Kitty party, and Valentine's Day my Gypsy and Expression are going to be buzzing!
A few challenges:
Whimsical Wednesdays - anything goes
More Than Favors - get animated
Scrappy Moms Stamps - cartoon characters
Wags'n'Whiskers - valentines/love
Corrosive Challenge - I love you
Robyn's Fetish - love and hearts
Stampin Sisters in Christ - make a heart stand out on your project
Drunken Stamper - love
JUGS - red, white and pink
Cupcake Craft - all you need is love
Simply Create Too - love is in the air
Lily Pad - inspiration picture
Aud Sentiments - use the word LOVE
Craft Us Crazy - Valentine/love and(or) animals
Crafty Creations - valentines
Anything Goes Challenge - for the one I love
Oldie But a Goodie - use something older (HKG was one of my first cartridges and include a heart
Hope you all have a wonderful day! I will be back in a a day or two with another project! Thanks for hanging out with me today.
A la prochaine...
Monday, January 23, 2012
Snow Much Fun!
Happy snowy Monday everyone! Today in Halifax it is chilly and icy, but tomorrow it's supposed to POUR! Gotta love winter in Eastern Canada... I wasn't planning to post today, but I am home with a munchikin with the stomach flu, and had a few crafting moments, so here is an extra post. I had some left over snowmen that I stamped with my PKS. I decided to use it to make a cute wintry card. Here it is:
So here are the details - I cut the snowman from Doodlecharms, I used the Hide Contour button on my to eliminate the snowman's face. Then I was able to stamp his face with my Happy Lashes stamps from Peachy Keen. Isn't he adorable all doodled up like that?? I tore some paper to make the snowy hills, and inked them up with my SU inks, and adhered them to a piece of blue reflections cardstock that I embossed with my Seeing Spots Cuttlebug folder. I created the little label the sentiment is on on my Gypsy. It is from Tags, Bags, Boxes and More. I manipulated the size, so it would fit my sentiment, and then i welded two small rectangle to the end so the ribbon would slip right through. I then inked the edges with pink and stamped it with a sentiment from CTMH. The snowflakes were punched from an old punch I got years ago, and I inked the edges with some pink and blue SU inks. I used my Sakura Jelly Roll pens to do some doodling.
I hope you all like the little card I created today. Thanks for hanging out with me! See you back her in a day or two.
A few challenges for my cute snowy card:
My Craft Spot - snow much fun
Fantabulous Cricut - label it
2 Sisters - embossing
The Ribbon Girls - use blue, pink and a ribbon
Stamptacular Sunday - seeing spots
Gingerloft Challenge - let it snow
Getting Cricky With It - let it snow/use embossing
Delicious Doodles - winter wonderland
Fussy and Fancy - let it snow
Raise the Bar - circles
DRS Designs - snowman
Sassy Studio Designs - frosty winter colors
Crafting For All Seasons - snowman/snow flakes
Sisterhood of Crafters - let it snow
Stampavie and More - winter
Cupcake Inspirations - pink and blue snowflakes
A la prochaine...
Friday, January 20, 2012
New Homes and New Beginnings
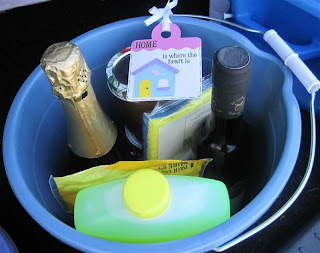
Happy Friday everyone! Recently, we had friends who moved into their first home together. I wanted to give them a cute and useful house-warming gift. Her is what I came up with:
We started by buying them a couple of bottles of wine, and putting in some homemade jams and pickles that we made last summer. I then hit up the local Canadian Tire, bought a bucket and filled it up with some essential new home cleaning supplies. Cute eh? It needed a little crafty touch though, so I decided to make a little tag for it:
I cut the tag from Sweet Treats - I love all the tags on that cartridge! The house is from Create a Critter. I used a stamp set from Close to my Heart for the sentiment. It is super simple, but added the personal touch I was hoping for.
A few challenges that I am entering my little tag in:
Divas by Design - new beginnings
Bling it On - new beginnings
By the Cute and Girlie - new beginnings
Marianne's Design Divas - in with the new
Whimsie Doodles Monthly Challenge - new life event
Ooh La La Creations - new beginnings
Paper Playtime - tag and a sentiment
Lets's Ink it Up - anything goes (must use a rubber stamp)
That Craft Place - home sweet home
Craft Your Days Away - new beginnings
A la prochaine...
Thursday, January 19, 2012
What's For Dinner??
Happy Thursday! I am excited to show you one of my FAVORITE projects ever :) I don't know about you, but "MUUUUMMM!! What's for dinner?" is one of the most common questions at our house. I saw an idea like this on Pinterest and knew I had to make one for my family. I found a 12.5 x 12.5 simple frame at Michaels, and decided it was perfect. Here is what I came up with:
I used Gypsy font, and welded and flipped it on my Gypsy. I laid it all out and cut it out in black vinyl. I cut it out as a mirror image of itself. The vinyl is adhered to the inside of the glass. That way, when I write on it with my dry erase marker, it is easy to wipe off - cause there is nothing at all on the fromt of the glass. Also, I can change out the 12x12 scrapbook paper inside the frame seasonally, or if I repaint my kitchen... all I have to do is pop off the back of the frame and replace the 12x12 paper. The vinyl words are on the inside of the glass. Neat, huh?
I have always used a weekly menu to cut down on grocery costs, and keep my life organized, given the challenges of shift work and a family schedule. This menu board keeps my husband and I organizes, while letting the kids know, at a glance, what's for dinner. Thanks for stopping by today :)
A challenge or two -
Hooked on Crafts - try something new - it was my first time cutting vinyl!
Lexi's Creations - anything goes
Make it Mondays - anything goes
The Crafter's Cafe - anything but a card
Truly Madly Crafty - anything goes
UnstampaBelles - anything goes with no stamp
Little Claire's Designs - anything goes
Secret Crafter Challenge - anything goes with blue
Crafty Purple Frog - anything goes
A la prochaine...
Wednesday, January 18, 2012
Here Comes the Sun!
Ugh! Winter!! Nova Scotia is in the midst of a cold snap. Wind chill on Monday was -25! That is COLD!! It,s Wednesday, so that means it's Cricut Cardz Challenge day. Today, Mary challenged us to make a "June in January" card. Here is what I came up with:
I used Smiley Cards for my card. I cut the circle base using the card feature from Smiley Cards, and cut the sun from the same cartridge. The sentiment is from my Simply Sweet stamp set. I thought it was perfect for this challenge! I discovered the problem with circle cards after I made this one. It is tricky to get the to stand still! They tend to do some serious rolling!
A la prochaine...
Friday, January 13, 2012
More Subway Style Art
Last week I showed the plaque I made for my mum. Today I am showing the plaque I made for my baby sister. Leslie is a doctorate student all the way across the country in British Columbia. She is studying Ethno-musicology at UBC, and spends a lot of time in Indonesia studying Gamelan. She is hard to buy for, so I decided to make her this plaque to help decorate her apartment:
The blue is not what I envisioned, but on the whole I am really happy with it! It uses lots of cartridges: Baby Steps, George and Basic Shapes, Gypsy Font, Lyrical Letters, Opposites Attract, Quarter Note, Robotz and Storybook. I designed her on my Gypsy girl - couldn't live with out her. I cut out the vinyl and adhered it to another plaque from Walmart. It has lots of wonderful musical terms and I hope Les loves it, and thinks of me when she looks at it!
Thanks for stopping by today.
A la prochaine...
Michelle
Thursday, January 12, 2012
Snowman Notes
Well, after some busy days at work, I am back. I made these cute little note pads for Christmas this year. They were teacher gifts and stocking stuffers. I even have one thrown in my purse. Here they are:
Pretty cute, huh? The snowman is cut from Doodlecharms. I used Peachy Keen's Happy Lashes to stamp his face. My jelly roll pens from Sakura did all the doodling. The cheeks were made with chalk and I used my markers from Stampin UP to color his nose and tongue. The stamp came from the dollar bin at Michaels. It has been altered slightly, I cut an image off it that I didn't like. I made the covers of the pad using old cereal boxes, cut the paper to fit and used my fabulous Bind it All to coil the pad. I love that tool!!
A few challenges:
Critter Sketch Challenge - snowman
Crafting for all Seasons - snowmen/ snowflakes
Sisterhood of Crafters - snow
Stampavie and More - winter challenges
Crazy Amigo Challenges - winter colors
Creative Card Crew - snow day
Top Tip Tuesday - anything goes
Tuesday Throwdown - baby it's cold outside
Cheerful Stamp Pad - let it snow
Creative Stamp Friends - winter
Pollycraft Challenge - anything but a card
Sentimental Sundays - snow and blue
Exploring Cricut - winter scene
A la prochaine...
Michelle
Pretty cute, huh? The snowman is cut from Doodlecharms. I used Peachy Keen's Happy Lashes to stamp his face. My jelly roll pens from Sakura did all the doodling. The cheeks were made with chalk and I used my markers from Stampin UP to color his nose and tongue. The stamp came from the dollar bin at Michaels. It has been altered slightly, I cut an image off it that I didn't like. I made the covers of the pad using old cereal boxes, cut the paper to fit and used my fabulous Bind it All to coil the pad. I love that tool!!
A few challenges:
Critter Sketch Challenge - snowman
Crafting for all Seasons - snowmen/ snowflakes
Sisterhood of Crafters - snow
Stampavie and More - winter challenges
Crazy Amigo Challenges - winter colors
Creative Card Crew - snow day
Top Tip Tuesday - anything goes
Tuesday Throwdown - baby it's cold outside
Cheerful Stamp Pad - let it snow
Creative Stamp Friends - winter
Pollycraft Challenge - anything but a card
Sentimental Sundays - snow and blue
Exploring Cricut - winter scene
A la prochaine...
Michelle
Monday, January 9, 2012
The Wheels on the Bus
Hmmm... in the chaos that was fall in my world, it appears that I never got around to posting this card. I made it for my daughter's teacher, to celebrate the first day of school. She started primary this year, my big girl! Isn't it cute?? I cut the bus out of Doodlecharms. Made the background by welding together the shadows of the bus, and then layered the bus on the front. The kids are all cut out of EDPD. Don't you love the faces on them?? They are from Peachy Keen stamps. I just adore their stuff! The Hello is from CTMH, and I used my Sakura Jelly pens for the doodling. I love how it turned out, and I know that Madame loved the cute card from Gabrielle. A challenge or two: Crafty Bloggers Network - anything but a square Paper Sundaes - saturated colors (bright yellow is a saturated color, right?) CES Challenge Blog - anything goes Our Creative Corner - shaped cards Card Crafter's Circle - make it colorful Alphabet Challenge Blog - Xtra special occasion - I think a 5 year old's first day of school counts :) Thanks for hanging out with me today :) A la prochaine... Michelle
Sunday, January 8, 2012
Gingery Goodness
I was in a domestic mood the other day, and made these delicious cookies. They are my husband's absolute favorite, his mom's Gingersnaps. I had never made them before, but for my first try, I think they were really yummy. Don't they look delicious?
I have no idea where she found the recipe, but she has been making them forever.Here is her recipe:
Ginger Snap Cookies
2 cups flour
1T ground ginger
2t baking soda
1t ground cinnamon
1/2t salt
3/4 cup shortening
1 cup sugar
1 egg
1/4 cup molasses
sugar for rolling
Set the oven to 350
Measure the 1st five ingredients. Sift them 2 times and then return them to the sifter.
Cream shortening in a medium bowl. Add sugar gradually and beat well. Beat in eggs and molasses. Sift 1/4 of the dry ingredients into the wet mixture and blend. Continue until all the dry ingredients are blended.
Take teaspoonfulls of dough and form into small bowls by rolling gently between palms. Roll the cookies in sugar to coat the entire outside.
Place 2 inches apart on an ungreased cookie sheets. Bake 12-15 minutes until tops are slightly rounded, crackly and lightly browned.
*** According to my mother in law, the key to these cookies is to take them out when they are crackly but still puffy. Then you get a soft and chewy ginger cookie.
It is worth the extra time to sift these cookies. It keeps them light and chewy. I hope you try these favorite's of my hubby. Thanks for hanging out with me today :)
A la prochaine...
Michelle
I have no idea where she found the recipe, but she has been making them forever.Here is her recipe:
Ginger Snap Cookies
2 cups flour
1T ground ginger
2t baking soda
1t ground cinnamon
1/2t salt
3/4 cup shortening
1 cup sugar
1 egg
1/4 cup molasses
sugar for rolling
Set the oven to 350
Measure the 1st five ingredients. Sift them 2 times and then return them to the sifter.
Cream shortening in a medium bowl. Add sugar gradually and beat well. Beat in eggs and molasses. Sift 1/4 of the dry ingredients into the wet mixture and blend. Continue until all the dry ingredients are blended.
Take teaspoonfulls of dough and form into small bowls by rolling gently between palms. Roll the cookies in sugar to coat the entire outside.
Place 2 inches apart on an ungreased cookie sheets. Bake 12-15 minutes until tops are slightly rounded, crackly and lightly browned.
*** According to my mother in law, the key to these cookies is to take them out when they are crackly but still puffy. Then you get a soft and chewy ginger cookie.
It is worth the extra time to sift these cookies. It keeps them light and chewy. I hope you try these favorite's of my hubby. Thanks for hanging out with me today :)
A la prochaine...
Michelle
Saturday, January 7, 2012
Boy Birthday Bag
I don't know about you, but my kids seem to go to quite a few birthday parties! I am constantly trying to find and make appropriate cards, and spending tons of money on gift bags, and wrapping paper! We tend to give a gift card - usually from a book store like Chapters, or the movie theatres, and a little toy chosen by the kids - a couple of Hot Wheels, or a little doll, some gum or candy... It occurred to me that all I really needed was a cut little bag and a tag. So I decided to make one. Here is my "boy version": The bag is cut from TBBM. I designed it on my Gypsy girl, and made it as big as I could using a 12x12 piece of paper. The car is from Boys Will Be Boys, and is cut at 2 inches. "Happy Birthday" is from Paper Lace cartridge, cut at 2.4 inches. The tag is just a layered circle for George and Basic Shapes, and the truck is welded to the small circle. It is from Boys Will Be Boys and is cut at .7 inches. The "To" and "from" are from My Pink Stamper Stamps, and the sentiment is from Simply Sweet Stamps. This was the first tag like this I made. I have since left off the sentiment and put it on the back. That left the kids more room to sign it, especially my 6 year old. Here is the little bag all ready to go. It has 2 Hot Wheels cars in it and a Walmart gift card, which is what my son wanted to give his best friend. I have not needed a girl version yet, but as soon as I do, I will post it here. Thanks for hanging out with me today :) A la prochaine... Michelle
Friday, January 6, 2012
Subway Style Art
I have recently become a Pintrest addict. I have found some really nice ideas there. I have seen a lot of "subway art" which I thought was so interesting. I decided to try some myself, using vinyl and my Cricut.
So,one day, at Walmart, I found some wooden plaques - they were only $4! I decided to pick 2 up, and try to make some subway art... Here is what I cam up with:
My mum is a quilter and sewer. She makes the lovliest things. I decided to make a Subway Art style plaque for her room. I used my Gypsy Girl to lay out the plaque. I apinted the plaque with tole painting paint, cut out the vinyl, and that was it! I used the following cartridges to create this plaque: All Mixed Up, Baby Steps, Birthday Bash, George and Basic Shapes, Gypsy Font, Disney - Happily Ever After, Lyrical Letters, Makin the Grade and Robotz. Whew, that was quite a few!
I was so pleased how this turned out, and I love the potential! I made a second one for my sister, and I'll be sure to post that next week! Thanks for hanging out with me today :)
A la prochaine...
Michelle
So,one day, at Walmart, I found some wooden plaques - they were only $4! I decided to pick 2 up, and try to make some subway art... Here is what I cam up with:
My mum is a quilter and sewer. She makes the lovliest things. I decided to make a Subway Art style plaque for her room. I used my Gypsy Girl to lay out the plaque. I apinted the plaque with tole painting paint, cut out the vinyl, and that was it! I used the following cartridges to create this plaque: All Mixed Up, Baby Steps, Birthday Bash, George and Basic Shapes, Gypsy Font, Disney - Happily Ever After, Lyrical Letters, Makin the Grade and Robotz. Whew, that was quite a few!
I was so pleased how this turned out, and I love the potential! I made a second one for my sister, and I'll be sure to post that next week! Thanks for hanging out with me today :)
A la prochaine...
Michelle
Wednesday, January 4, 2012
Welecome 2012
Good morning everyone! Welcome to my first crafty project of the year. Today Mary challenged the Cricut Cardz Design Team to make a New Year's card, using any cartirdge and colors we wanted. Our New Year's Eve traditions are very simple. We order chinese from our favorite spot, and watch a few movies with the kids. However, as a young girl I used to babysit alot, and every New Year's Eve the couples got all dressed up and went to some sort of elegant party. I decided to make a card that reflected my old ideas of New Year's Eve - glamorous and elegant. Here is what I came up with...
It is a 4.5 x 4.5 inch square card. The layer is cut from Paper Lace, I love how it looks layered on black. The pink ribbon is from Stampin Up, and added that splash of color I wanted, and the stamp is from Close to My Heart.
I hope you all come over to Cardz TV, and play along with us.
A few challenges:
The Emerald Faerie Garden - flourishes and swirls
Creative Stamp Friends - New Years Cards
There She Goes - New Year
Addicted to Stamps - something new - new year, new baby, new house...
Come and Get It - New Year
Just Some Lines - new year
A la prochaine...
Michelle
It is a 4.5 x 4.5 inch square card. The layer is cut from Paper Lace, I love how it looks layered on black. The pink ribbon is from Stampin Up, and added that splash of color I wanted, and the stamp is from Close to My Heart.
I hope you all come over to Cardz TV, and play along with us.
A few challenges:
The Emerald Faerie Garden - flourishes and swirls
Creative Stamp Friends - New Years Cards
There She Goes - New Year
Addicted to Stamps - something new - new year, new baby, new house...
Come and Get It - New Year
Just Some Lines - new year
A la prochaine...
Michelle
Tuesday, January 3, 2012
Happy New Year!
Good Morning everyone! Happy New Year! I am happy to be back The past few months I have been feeling anti-crafting. I did a couple of craft shows, which were fun, but VERY time consuming and energy sucking! I decided to take a little break from the blogging world. But, now I'm back. I am planning to post here about more than just crafts. There are so many things I enjoy - cooking and baking, photgraphy, spending time with my munchkins and hubby, so this is going to be a bit more generic. There will still be lots of crafts, I do love crafting so much :) but there will be other things too.
In that spirit, here is a wonderful lemon loaf I made the other day. My parents were over for dinner, and this was dessert.
Doesn't it look delicious?? I had a really hard time finding a lemon loaf recipe that actually included lemons IN the loaf. This had a delicious, light and lemony flavor, and the glaze was perfect. I found the recipe HERE.
Be sure to come back tomorrow, to see my design team creation for Cricut Cardz Challenge. On Thursday or Friday, I will be posting a present I made - they are my new obsession :)
A la prochaine...
Subscribe to:
Posts (Atom)